Windows keeps firing out new updates every month and sometimes you might want to install your Windows 10 updates without having to connect to the internet every time.
This is also the case when you’re installing a fresh copy of your operating system and don’t have the required drivers yet.
Whatever the case may be, we will let you know how to install Windows 10 updates offline.
Why You Need to Stay Updated at All Times
Your PC will function normally even if you don’t install any updates. However, it is always best to keep everything up to date.
This doesn’t only mean the official operating system updates from Microsoft, but also all other software updates and drivers on your system.
Microsoft, along with other software developers release updates to keep their products secure and functioning.
When it comes to your operating system, it is the key to everything on your machine which is why it is crucial to keep it secure.
Every service pack update that has come out for Windows contains tons of different security updates and fixes as well.
The biggest reason why so many security updates come out constantly is because of flaws found within the system by white-hat hackers and bug bounty hunters.
This means once someone has found a flaw in the design, everyone from the malicious side of the user-base will be taking advantage of them as well.
A simple anti-virus or malware software is not enough to keep your files protected, which is why you should download all the updates as soon as they become available.
The only reason you might not need to constantly update your machine is if you never connect to the internet, but this is very rarely the case as nearly every PC user has internet access.
In fact, in order to take full advantage of your system, you need to access the web to even activate it fully. Thankfully we have a bunch of ways to update your Windows 10 offline if you can’t connect to the internet.
Installing Updates Offline via Local Area Network (LAN)
The first method to download Windows updates offline is to grab those updates from another PC in the same network. The only thing this requires is for you to have another machine connected to the same router or network and it needs to have the updates downloaded.
These updates can then be transferred using a brand new feature introduced by Microsoft in Windows 10 operating systems.
Transferring files across a local network is a lot faster than downloading them as the speed is only limited by your routers capacity. It will also spare your internet bandwidth as you don’t need to spend hours downloading the same files twice.
Thankfully the only thing you need to do to enable this feature is to enable Delivery Optimization from the Windows settings.
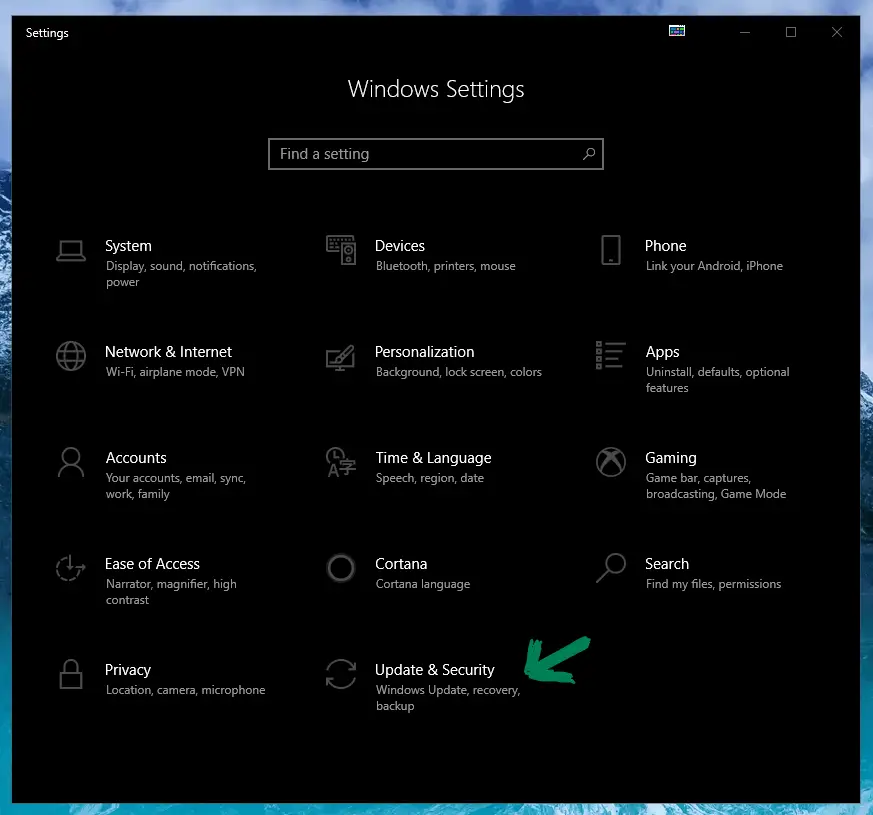
The only thing you need to do is top open up your Start Menu by pressing the Windows key and typing in Settings.
Open up the Settings app and a new window should open up with a bunch of tabs. Look for the one labelled Update & Security and open it up.
Now that you’re the Updates section of the settings, you should see a Delivery Optimization tab on the left menu.
Click on it to see your delivery optimization settings for Windows. Once opened, you should see a section labelled “Allow downloads from other PCs“.
Now all you need to do is toggle the switch on and select the “PCs on my local network” option to enable local update transferring.
Now you should be able to transfer any updates to your machine as long as you have enabled this setting on your other machines as well.
In some cases, the option to allow downloads from other PCs is disabled or grayed out. This was the case for us, when we tried out this method as well.
We did some research and found a way around this limitation.
How to Fix Grayed Out or Disabled Delivery Optimization
When we were trying to enable Delivery Optimization for our copy of Windows 10 to download and install updates offline, we noticed the option to allow downloads from other PCs was disabled and turned off.
In normal situations this might happen if you are not the system administrator and shouldn’t be messing with these settings in the first place.
However, when using a personal computer while being the System Administrator, this option shouldn’t be disabled.
Note: You can also use this same method to disable downloads from other PCs if you wish.

After some research, we found out a way to turn it on. This method basically requires you to edit your Windows registry to enable the feature manually. This might sound a bit sketchy, but it’s a lot easier than it sounds. We attempted it and everything started working perfectly.
We feel obligated to say: take a backup of your registry and files before doing this, but you should be just fine if you follow these steps.
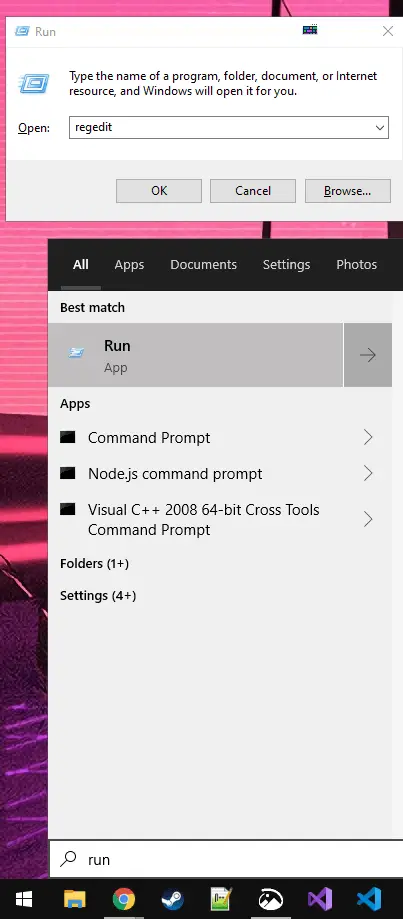
The first thing you need to do is get to your registry files. You can do this by simply typing run in your start menu and launching it.
Then in the Run window, you need to type in regedit and press OK.
You should now see a long folder hierarchy on the left side of the registry window. Navigate to this path: HKEY_LOCAL_MACHINE\Software\Policies\Microsoft\Windows\DeliveryOptimization
Then click on the DeliveryOptimization folder to see the registry entries related to it on the right side of the window.
Next up, you should see a file labelled DODownloadMode on the right. You can double click on it to edit the value.
It has basically 3 options. You can either enter 0 for disabled, 1 for PCs on my local network or 2 for PCs on my local network, and PCs on the internet.
The latter 2 will also enable the feature, setting the selection as shown in the screenshot above.
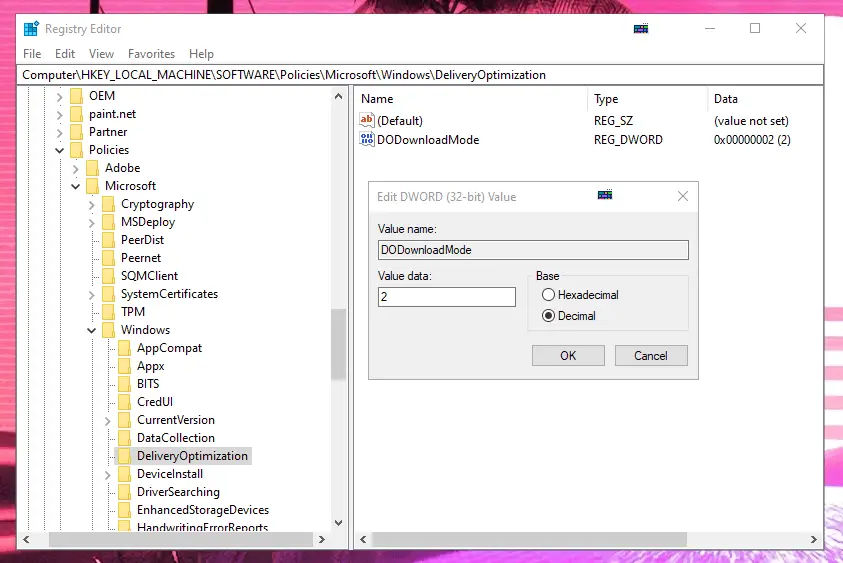
Make sure to select the Base as Decimal then enter either 0, 1 or 2 in the Value data field. Then just press OK and you’re done.
You can always come back and reset it to 0 if it didn’t work for you.
Make sure to restart your PC afterwards to make sure all the settings have fully updated.
Update Windows Offline with the Media Creation Tool
You may have heard of the Microsoft’s official Media Creation Tool. It’s basically a software to format an external drive into a Windows installation format.
It can be used to create a bootable Windows installation from your current operating system. The great thing about it is, if you have installed any service packs or updates, they will be included within the installation.
The reason you need to use this tool is because it’s not possible to just drag and drop Windows update files onto a USB stick.
This is because it needs to be in a official secure format for Windows to accept it. Otherwise there would be a lot higher chance for malicious files and corrupted updates.
To get started with installing Windows 10 updates offline with the Media Creation Tool, you need a few things first. Follow the steps below and you will be set to go.
Setting Up the Media Creation Tool
The obvious first step is to download the tool. You can find the official download page for the tool on the Microsoft website. Follow the link to the website and click on the “Download tool now” button to start the download.
You also need an empty USB flash drive with at least 8 GB of storage space. This is the minimum capacity requirement for the installation files. The drive has to be empty because the tool will overwrite everything on the drive to format it properly. This means if you have files on the drive, they will be deleted.
Now that you have your removable USB storage plugged in, start up the Media Creation Tool. You will have to go through a few prompts like accepting the terms and selecting which format you would like the installation to be in (Language, Windows edition and architecture).
Those settings will default to your current specs, but you can change them as you’d like.
Finally you should see a list of removable drives that can be used for the process.

Once you have found one to use, click on Next to start the installation.
It can take quite a while as the whole USB drive needs to be formatted and a lot of files will be installed on it. Once this has been completed, you can move on to the next step, installing the updates on your target machine.
Installing the Updated Windows to Target System
You should now have a flash drive with an official Windows installation on it. The next step is to plug that drive into the machine you wish to update.
Navigate to your “This PC” in your file explorer to see your connected devices. Look for the USB drive and run the “Setup.exe” within the drive.
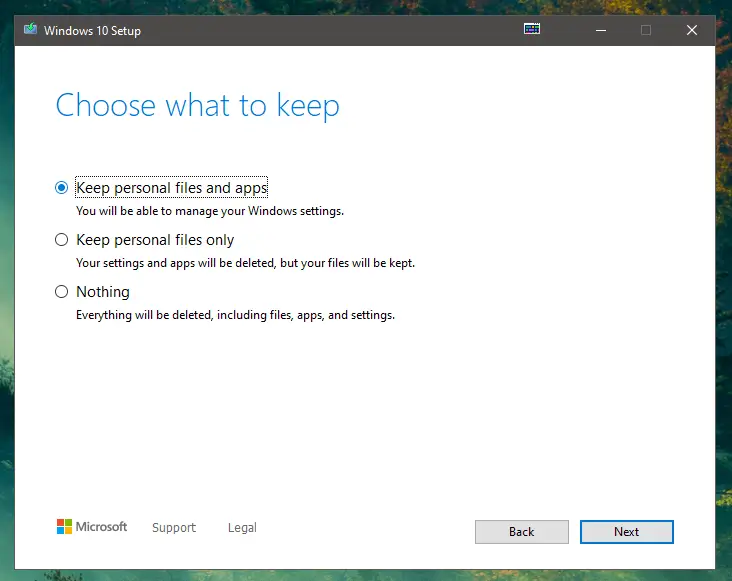
You will be greeted with the same media creation window you previously installed the files with. Next you need to select whether you wish to keep all your apps and settings on the current system in tact or if you wish to do a clean install.
In our case we want to select the first option “Keep personal files and apps“, as we wish to only update the operating system. This way no files, apps or settings will be affected by this update process.
Finally, all you need to do is click “Next” and then “Install” in the following screen. Note that you will need approximately 10 GB of free space on your machine to run the installer. If you don’t have enough free space, you will see a screen asking to clear up some space.
If you can’t clear up any useless data, you can insert a secondary USB drive with enough storage to use as a temporary storage device. This way the installer will use that device to store all the temporary files needed for the installer to finish the setup.
The secondary storage device will not be wiped, so you don’t need to worry about any existing files on it.
Now you should be done and your system will have all the same updates you had on your original operating system, all without an internet connection.
Find Updates via Windows Update Catalog
This final method requires you to find specific updates, download them, and finally install them on any device of your choosing at a later date.
Microsoft stores all their existing update files and installers in the cloud. They have made a nifty list of all of them for you to download. The only issue is that you need to know the name or part of the name of each update you wish to download.
You can access the official update catalog on the Microsoft Update website. You can use the search bar at the top of the page to look for the updates you wish to download.
Once you find an update you need, just click on the download button on the right side. This will open up a new window with a link to the specific file. Clicking on that filename will initiate the download.
Most of the updates will be downloadable in an executable (.exe) format which can be ran directly to install them.
However, some files can only be downloaded as cabinet files (.cab) which are a bit more complicated to install. If you wish to install an update through a cabinet file, you can follow the simple instructions below.
How to Install a Windows Update Cabinet File (.cab)
In order to install a Windows update from a cabinet file, you need to use the Command Prompt. We made an extensive guide on how to use the Windows Command Prompt, if you wish to learn more about all the things you can do with it.
Note: This only works for Windows Update KB installers, not driver installers. If you need to install a cabinet formatted driver, you need to extract the files from the .cab file using an extraction tool like 7-zip, then run the setup.exe found within those files.
First you need to launch the Command Prompt as an administrator. If you don’t know how to do that, check the guide linked above, as it contains an easy newbie friendly way to do so.
Now that you have the cmd opened as admin, you can use the DISM command to install cabinet files. All you need to know is the path to the folder where you downloaded the installation file.
In our case, we moved the file to the following path: C:\Users\TechTipVault\Downloads\windows_update_file.cab
Now that you know the path, use the following format to run the DISM command in the command prompt:
DISM /Online /Add-Package /PackagePath:"C:\Users\TechTipVault\Downloads\windows_update_file.cab"
Although the command has /Online as a parameter, this does not mean you need to be connected to the internet. The parameter just means that this package will be installed to the currently running operating system.
Now you have successfully installed a Windows update or hotfix in a .cab format.
We’ve outlined all the best ways to install Windows updates offline and we hope you found a method that works for you. When it comes to updating an operating system, you should always take a backup of your files as you never now if something goes wrong.
Windows updates are notorious for blue screens and other issues, so it’s better to be safe than sorry. We also recommend checking out how to speed up your Windows 10 to make the updates work faster and smoother in the long run.