
When a keyboard key stops working, you can remap that key to a different one very easily, so you don’t have to buy a new keyboard because of one malfunctioning button.
This is also useful if you have a full-sized keyboard with a numpad or even separate media keys, you can edit those buttons to do more useful action that you actually use.
Thankfully it is very easy to create custom actions for any key on Windows with the use of a free open-source program called Sharpkeys.
Setting up the SharpKeys Software
The first step is to download SharpKeys Software from GitHub or another trusted source. It is a free open-source software that allows you to remap any keys on Windows by modifying the registry.
You can download the MSI installer file to go through a normal installation wizard, or download the zip-file to just extract the executable and run it without separate installation.
Finally, you must run the program with elevated permissions, as registry modifications are not allowed by third-party software by default.
To do this, first right-click on the downloaded executable, then from the popup-menu select ‘Run as Administrator’ in order to have proper permissions to modify keyboard keys.
Using Sharpkeys to remap keyboard keys
Now that you’ve installed and opened SharpKeys it’s time to make some custom keyboard key remapping on Windows.
In order to change the function of a keyboard key, locate and click the ‘Add‘ button on the bottom left.
A new window should pop up and you should see two separate lists. Both lists contain all the different keys on the keyboard.
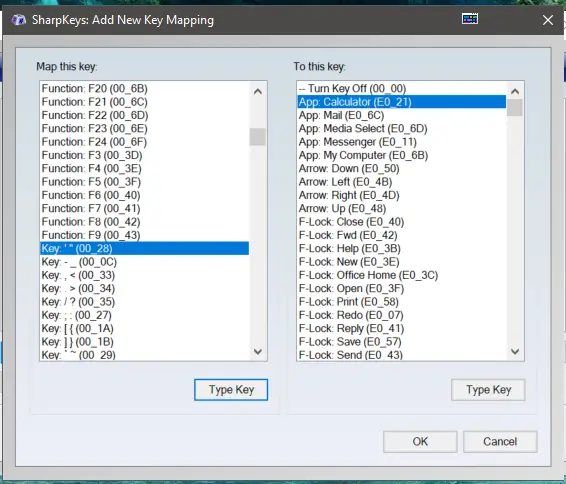
The left section contains the Map this key list (From Key) functionality. You must select the key you wish to use for your new action. For example, if your ‘Enter’ key stopped working and you wish the remap it to your ‘single quote’ key, you should select the ‘single quote’ key from the left column.
The right section contains the To this Key list (To key) settings, which is the function that decides which key will be replaced.
If your keys work and you just want to remap them, you can also click the ‘Type Key‘ button and press to key to find it from the list instantly.
After you select the button codes from both lists, click OK to save the selection and the combination will show up in the main Window.
Saving and activating the new key functions
After you set all up all your desired buttons with the custom functions and see them in the main list, you are ready to activate them.
In order to use your new keyboard shortcuts, you need to add them to the Windows registry.
Click the button that says ‘Write to Registry‘ in the main SharpKeys window. This will write all the key modifications and shortcuts into the Windows registry.
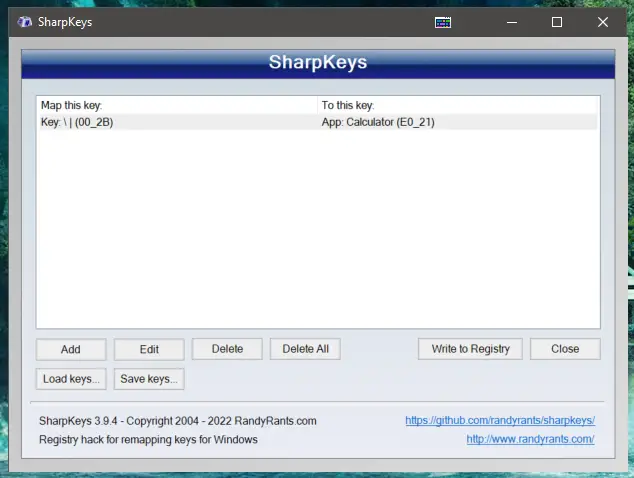
Once you clicked the button, you should get a message confirming that the writing was successful.
Now your new shortcuts should be properly mapped and you can safely close the SharpKeys window.
In order to activate the new changes to the custom keyboard key functions you might need to restart your computer. After the restart process is complete, the custom button functions should start working.
If for some reason they haven’t activated properly, make sure you followed each step correctly. You can also try some simpler shortcuts first just to make sure they’re activating properly.
Returning the custom keyboard shortcuts back to normal
If you have previously set several buttons to replace the functions of other keys on the keyboard, you might want to reset them back to default.
SharpKeys makes it very simple to restore all default keyboard key functions back to normal.
All you need to do is open up SharpKeys, then click the ‘Delete All‘ -button and to fully activate the deletion, click the ‘Write to Registry‘ -button once again.
After that, restart or log out and the changes should take effect. Afterwards, all your keyboard shortcuts should be reset back to normal.
If you like to change different remapping configurations for different purposes, you can use the ‘Load/Save Keys’ buttons to save separate lists of you chosen mappings that you can easily load into the software and write them to registry fast and easy.