
Installing a Linux virtual machine on Windows 10 has never been easier. With earlier versions of Windows, users only had two options to use Linux.
The first was to go through the struggle of installing a dual-boot operating system if they wanted to toggle between Windows and Linux. That required a USB boot drive and shutting down the Windows OS first.
The other way was to purchase virtual machine software to install the operating system with. Although a more convenient method, the virtualization required a lot of processing power.
On top of that the user needed to download a compatible ISO file to run the operating system.
Now all you need to do to run a Linux VM on Windows 10, is use the Hyper-V capabilities and install Ubuntu inside the Hyper-V manager to launch it at any time with a few clicks.
We also made a video version of this guide on our YouTube channel, if you would rather follow along a video format:
Make sure your PC is capable of running a Linux VM
There are a few requirements to ensure that your PC is able to run the programs necessary. Thankfully it’s a very easy check.
Operating system wise, you need to have either a Pro, Enterprise, or Education version of Windows 10.
In order to check if your machine is capable of running a Linux virtual machine, you first need to open the command prompt.
You can do so by opening the start menu or by pressing the windows key on your keyboard, then typing in ‘cmd‘ and pressing enter.
Type ‘systeminfo‘ into the command prompt and press enter to execute the command. A bunch of information should show up, but you only need to care about the last four lines.

If all of them say Yes, you’re good to go!
Enable Hyper-V on Windows 10
Hyper-V is the key to installing a Linux or Ubuntu VM on Windows 10. It is a built-in alternative to a virtual machine software like VirtualBox.
The Hyper-V takes advantage of a new feature in Windows 10 called Virtual Desktop. If you want to learn more about how to use a Virtual Desktop to toggle between multiple desktops in your work space, check out our article about it.
Virtual Desktop combined with Hyper-V virtualization basically allows you to swap between your normal operating system desktop and a Linux desktop with one press of a button.
This way you can easily toggle between screens, copy text between the systems and much more.
First you need to open your start menu and type in ‘Turn Windows features on or off‘.
Once you see the option, click on it to go to the control panel. You should now see a small window with a bunch of folders with check-boxes next to them.
Look for the folder called ‘Hyper-V‘ and click on the plus next to it to expand its sub-folders.
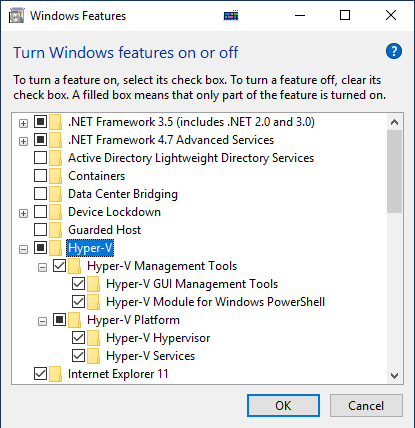
Tick every box under the Hyper-V folder and click OK.
Windows will the install the required package and included features. After this you will be prompted to restart your PC. You need to actually restart your machine for this to work, so we recommend you bookmark this page and come back when you have restarted.
Starting up Hyper-V Quick Create
Now that you’ve enabled Hyper-V and restarted your machine, you’re ready to run the Ubuntu VM on Windows 10.
Again, open up the start menu by pressing the windows key on your keyboard and type ‘Hyper-V’ into the search bar.
You should see an option called Hyper-V Quick Create, go ahead and start it up.
If you found the icon and it launched fine, you can move on the the next section to install Linux.
Can’t see the Hyper-V Quick Create shortcut?
This seems to be a very common occurrence, it even happened to us when trying to make this work for the first time. Thankfully a little research goes a long way and we’ve done it for you.
First, open up the start menu and look for a folder named Windows Administrative Tools. Look for Hyper-V Quick Create there.

If you can’t find it in the above folder either, that means the tools just aren’t installed. This was the case for us as well.
To fix this, you need to download and install free Remote Server Administrator Tools for Windows 10. It is an official toolkit from Microsoft that should be included with every Windows 10 installation since 2018, but for some reason that is not always the case.
Download one of the installers from the above link and run it. You will need to restart your computer after it’s done.
Once you’ve done that, you should be able to find the Quick Create shortcut in the Windows Administrative Tools folder shown above.
If you can’t see it even after all the above steps, leave a comment below and we’ll help you out.
Install Linux on the Virtual Machine
Now that you’ve found the Quick Create shortcut, a window should pop up which allows you to choose which operating system you wish to download.
Although one of the options is a Windows 10 OS, it’s not a free license for Windows, but an evaluation copy that expires in a few days.
Select Ubuntu Linux from the list and click Create Virtual Machine. Windows will now automatically download and install the operating system.
After that’s done, the virtual Linux operating system will show up in a new window and you can continue on to set it up.
That’s all you need to run Ubuntu Linux fast and simple on Windows 10.
How to launch your Ubuntu Linux Virtual Machine faster
If you want to start up the machine faster, you can do so from the Hyper-V Manager.
You can open it up by typing that into the search bar in the start menu or look for it in the Windows Administrative Tools folder.
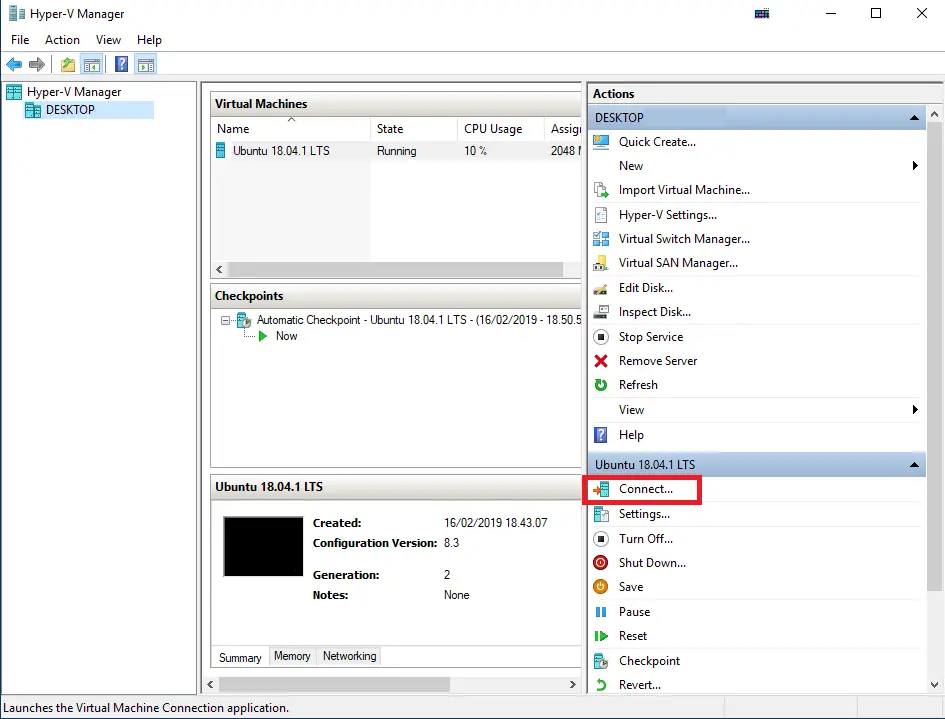
Once you open it up, you should be able to see your machine name on the left hand side. Choose it and it should show your newly created Ubuntu operating system in the Virtual Machines Box.
To launch the virtual machine, select it from the list and click on ‘Connect…‘ on the right hand side of the window.
Now your new Ubuntu Linux virtual machine should start up fast and easy.
You can use this same method to install and run any other VM on Windows 10 as well.
If you’re looking for more ways to take advantage of the new Windows 10 features, check out our article on window management on Windows 10.