Twitch Alerts are a crucial tool in every streamers arsenal. Whether on Twitch or on YouTube, you want to broadcast new donations and followers to the world. However, you don’t want to have to do this manually or do any extra work. This is where Twitch Alerts come in to automate the process.
Note: This guide also applies to YouTube gaming streams!
What are Twitch Alerts?
Twitch Alerts was previously the name of the company providing all kinds of alerts and notifications for streamers to use. It has now re-branded from Twitch Alerts to Streamlabs, but the product remains the same.
Twitch Alerts basically allow you to automatically broadcast new followers, messages and donations to your stream automatically. You can add custom graphics, sounds and text to those alerts as you please. This has become increasingly simple to do and best of all, it’s free!

Twitch Alerts Setup without OBS
Setting up Streamlabs and twitch alerts is now easier than ever. You don’t even need to have any streaming software pre-installed as Twitch Alerts now provides a free standalone installer.
You can download the latest version directly by clicking here or by going to the Streamlabs Twitch Alerts website and finding the download link.
Once you’ve installed the software through the installer, all you need to do is enter your login credentials and you’re good to go. It’s very similar to the normal OBS interface as it is built on the same engine.
Streamlabs own software with Twitch Alerts has tons of cool built-in features that normal OBS doesn’t. This includes thousands of easy to install custom themes. You can browse some cool samples at the Streamlabs Library.
The software also has advanced video encoding for better stream quality and lower latency.
On top of that, it can combine different layers and videos into one to reduce processing power requirements. This way your stream will run smoothly even on lower end devices.
Twitch Alerts Setup in OBS Studio
If you prefer to use normal OBS Studio for your streaming, you have to install the Twitch Alerts manually.
First, to make your alerts, go to the Streamlabs dashboard and click on Alert Box under Widgets in the side panel.
Once you have filled in all the data to any of the alert types, click on ‘Save Settings‘ at the bottom of the page.
This will then show a Widget URL box at the top of the page.
Copy this URL and go to your OBS Studio. Within your Sources box in OBS Studio, click on the + -icon to add a new source.
As the source type, choose Browser Source and enter a name for your source.
Now all you need to do is paste the address you copied from Streamlabs into the URL field within the window that pops up. Ta-da, you’re done!
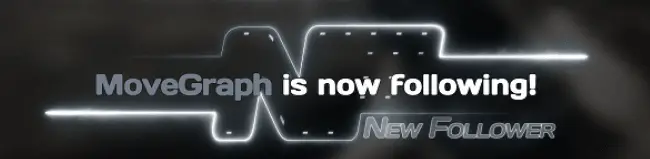
To test if it works properly, you can go back to the Alert Box page and click on any of the Test buttons under the Widget URL.
That’s how simple it is to setup Twitch Alerts in OBS studio and even easier without it. Now all you have left to do is enjoy your craft and the audience will follow.
If you are looking to download clips from YouTube to show as your Twitch Alerts, you can find out how to do that for free with our new 2020 guide.