Changing a Steam game installation folder to a new one has never been easier. It used to be a risky and time consuming chore and you could never be sure if everything stays the same.
The problem with moving game installation folders manually is that it doesn’t update everywhere. There are paths and registries that get written during the first installation phase. When you drag and drop a folder elsewhere, those entries don’t change. This may result in broken save-games or even the whole game being corrupted.
As another extreme case, some people tend to do is re-install Steam completely in order to change a drive where the games are installed on. This is slow, tedious and definitely not efficient.
Thankfully recent updates the the Steam platform make the process of moving a steam installation to a new folder super simple. You can even move Steam games between drives with this same method.
Add a new Steam Game folder
The first step is to choose a new folder where to move the game. It is possible to create a new folder for each game but it is recommended to just make one Steam folder for each drive. This way your installations are easier to maintain.
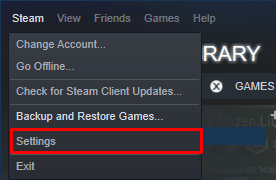
To make this work, you have to open up your Steam client and navigate to the Steam > Settings menu. You can find this at the top left corner of your window.
The Settings window will open up and show a bunch of tabs on the left hand side. Navigate to the Downloads tab to see your download speeds and download destination folders.
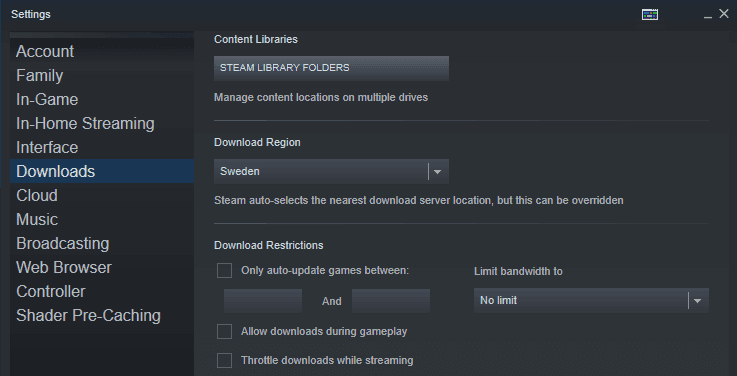
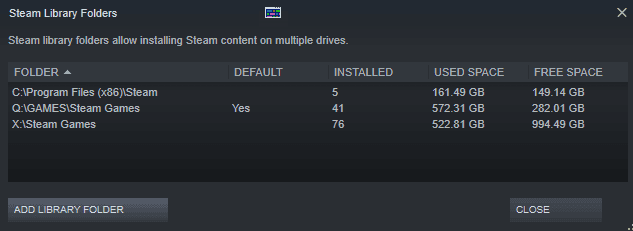
In the Downloads section you should see a button at the top that says Steam Library Folders. If you click on it, a window with all your current steam libraries will open. Most likely you will only have one folder shown in the list.
Now just click on the Add Library Folder button and you will get to select any folder as a Steam Library. Don’t worry, this won’t move any installations or games, it just tells Steam where you might want to move them in the future.
If you now click on your newly added folder, you can also set it as the Default folder so all future games will be automatically installed into that folder. This won’t affect any current installed games.
Move a game to the new folder
Now comes the fun, although painstakingly slow part. Search for the game you wish to move from your steam clients’ Library tab.
Once you’ve located the game you wish to move, right-click on it and go to Properties.
You should be greeted with a General tab showing information about the selected game.
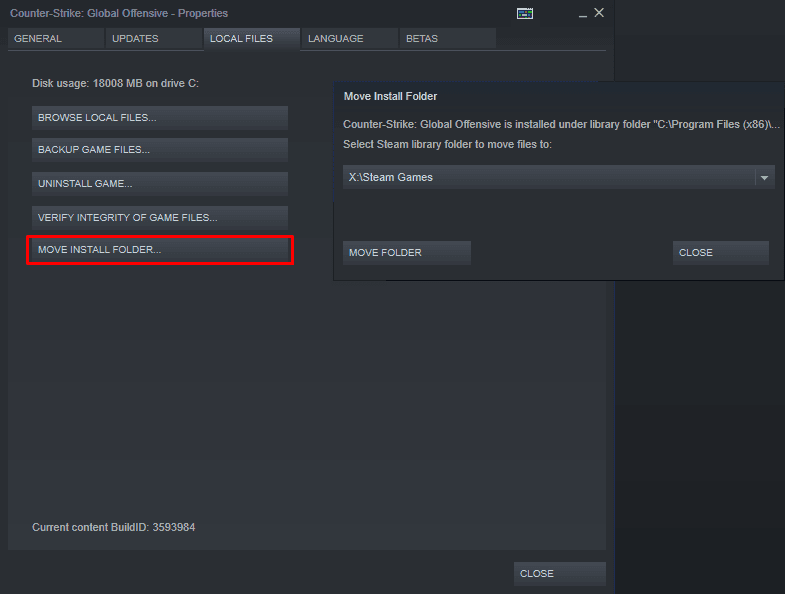
Navigate to the Local Files tab at the top of the opened window. You can find a bunch of buttons including Browse Local Files to quickly open the current installation folder. You can also Uninstall the game completely or verify the integrity of game files which will scan for any corrupted files and re-download them.
What we’re looking for is the last ‘Move Install Folder…‘ option. Click on it and select your newly added library folder from the drop-down list.
Once it’s selected, click Move Folder and wait for the files to transfer. You’re done! You can now do this for any old and future installations, no need to create the library folder again.
No Move Install Folder Option Visible?
In some cases a game might not have a visible button for the ‘Move Install Folder’ feature in the Steam game settings.
This is due to the fact that you have not created a folder to be used for game file transfers yet.
You can create a folder by following the steps mentioned here.
Once you’ve successfully created a folder with enough free storage space, the ‘move install folder’ button should become visible and you should be able to move your existing steam games between drives.
If you’re looking for more ways to enhance your Steam experience, check out our guide on how to pin your newly moved games to the windows taskbar.
If you don’t need any more shortcuts, you can also check out our new guide on how to sell your useless steam inventory items with a single click of the mouse.
