
If your machine is starting to feel sluggish or you just need a few extra frames in your games, you’ve come to the right place. We have collected all the best tips, tricks and hacks on how to speed up your Windows PC to a whole new level.
We have gathered both simple and advanced solutions, best of both worlds. However, we will make sure to explain everything clearly and simply so you don’t need to waste any time and understand how each solution helps make your computer work faster and more efficiently.
All the possible hardware issues slowing you down
There is a whole plethora of reasons why your PC or laptop is becoming sluggish and slow over time. They can be a combination of hardware and software issues, which is why tracking down the main culprit is not always an easy task.
Most of the tips and tricks in this guide are related to the software side of fixes and speed-ups, so we will dedicate this short section to all the possible hardware issues that might be slowing down your system.
Sluggish hard drives
Old and filled up hard-drives are a very common occurrence as most people don’t realize how important it is to clean them up.
If your operating system is installed on a slow hard disk drive, you might notice very slow load times and annoying lag when starting up apps or loading files. A slow drive will make your Windows boot time rocket sky-high.
In addition to slower speeds, the more files you have on your drive, the more time and resources it will take to index them all and find the files you need amidst all the garbage.
Thankfully solid-state drives are becoming more common and affordable every day. The difference in speed and performance between SSD’s and HDD’s is huge, so if nothing else, you should definitely get at least one SSD to install your Windows 10 on.
How much RAM is enough?
The eternal question of how much ram is enough splits opinions and there is no right or wrong answer.
However, there are some generic guidelines you can follow, depending on what you intend to do with your system.
Due to memory becoming more affordable every day and the rest of the components becoming more powerful, games and software are not afraid of requiring and utilizing more RAM to run anymore.
Obviously there are different types and qualities of memory including the old DDR3 and the new faster DDR4 RAM which will make a difference in their efficiency and speed.
If all you do is browse the internet, almost any amount of RAM will do, but we would recommend to get at least 8GB of RAM if you want to do any sort of gaming on your system.
If you wish to do any higher end gaming or any sort of coding, video editing and multi-tasking, you should go directly for 16GB of RAM, as they will eat up your memory fast.
Finally for high end photo- or video editing, you might want to shell out for 32GB and above, as rendering can require a lot of free memory to perform at maximum efficiency. However, in such scenarios it is more common to become bottle-necked by other components of your system.
Is your CPU a performance bottleneck?
It is a very common occurrence for people to just go and buy the latest graphics card and shove a few more gigabytes of RAM into their system in hopes for the ultimate gaming experience.
The issue with this is that your CPU is just as crucial to your computers speed and performance as your graphics card is for playing games.
If your processor is old and slow, it doesn’t matter how amazing the rest of your build is, all other components will be bottlenecked by the lack of processing power.
Some component will always be the weakest link in your computer so you can never completely eliminate bottlenecking, but making sure your parts are of similar quality is an important factor to make your computer run at peak performance.
CCleaner, formerly known as CrapCleaner, is one of the most well known free maintenance apps for Windows. It gives you tons of great tools to clean up all kinds of temporary files from your PC.
In order to access CCleaner, you will first need to download and install the program from the CCleaner Official Website. After installing the program, start up CCleaner and you will be greeted with the screen below.
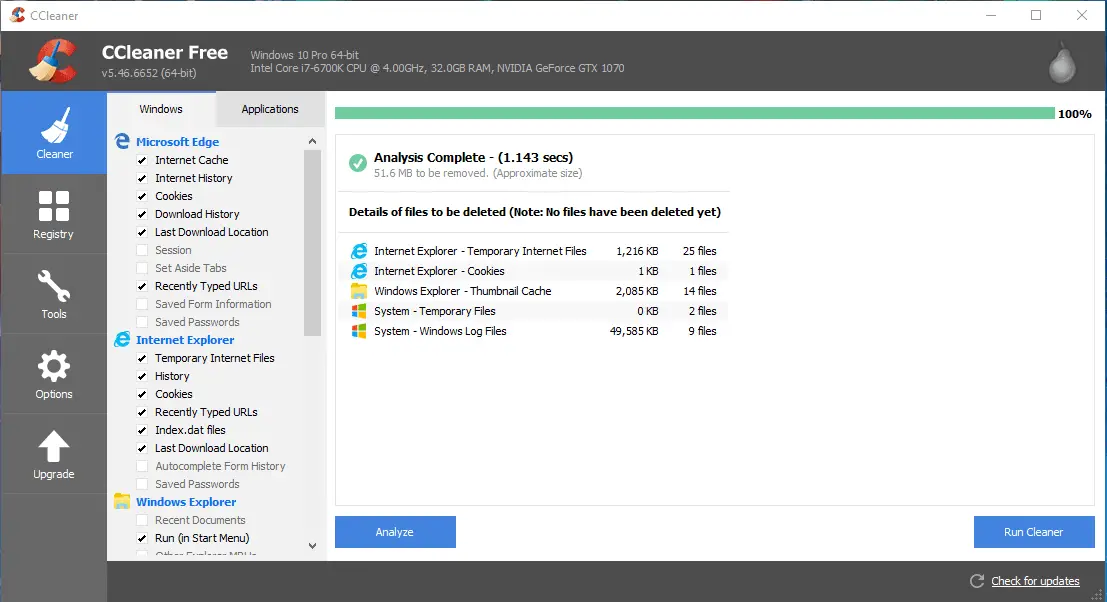
This initial screen will give you access to an array of performance enhancing tools that can be used to speed up your computer. You are now able to get rid of unnecessary files and settings that your computer stores overtime.
To perform the clean up functions that you selected on the left:
- Click ‘Analyze‘ to see which files CCleaner will safely delete wit the current options.
- After the Analysis is complete, all you need to do is click ‘Run Cleaner‘ and these files will be deleted, freeing up space on your computer.
Advanced users can take advantage of CCleaner’s more in-depth cleaning tools. These include features like:
- Registry Cleaner – Find missing DLLs and clean up any obsolete or broken registry entries. This won’t free up much space but will improve overall performance.
- Program Uninstaller – Remove programs from your computer that are no longer needed or take up too much space.
- Start-up Program Removal – Prevent unwanted programs from launching at start-up.
- Browser Plugins – Shows what Plugins are enabled on different browsers and which will hinder your browsing performance.
Empty out trash and delete files permanently
Many people forget that simply deleting an item from your desktop or computer does not remove it completely, but sends it to the computer’s Recycle Bin instead.
Files that are in your Recycle Bin still take up the same amount of space as they did before and if your Recycle Bin is never emptied out, it can reduce the performance of your computer and hard-drives.
A simple way to access the Recycle Bin is to use the Windows search bar and simply search for ‘Recycle Bin’.
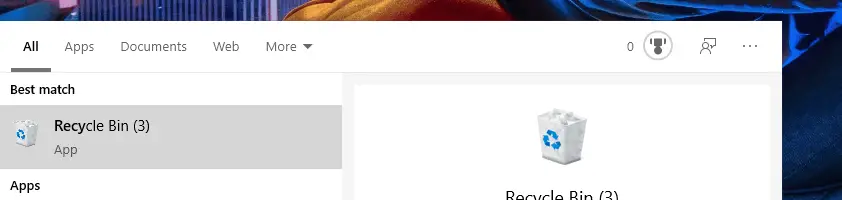
It should be noted that the Recycle Bin has a maximum size, usually around 5-15% of your total disk capacity. If your bin is nearly full when deleting another file, then the oldest file will be permanently deleted from your system.
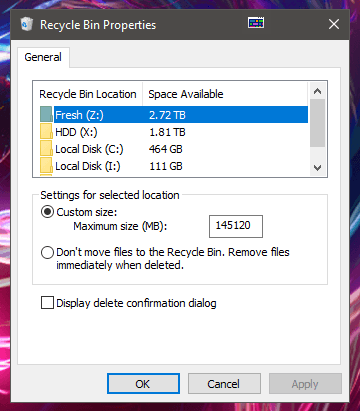
If you wish to increase or decrease the maximum storage space occupied by your bin, you can do this simply by right-clicking on the Recycle Bin icon and going to ‘Properties‘.
From there you can add any reasonable size into the Custom size text box. We still recommend not to increase the size too much to prevent slowing down your machine by filling it up even further.
Any large files that don’t fit in your bin are also permanently deleted and will not be shown in the Recycle Bin.
The majority of these files should be permanently deleted by right clicking the page and selecting ‘Empty Recycle Bin’.
As a useful tip, you can delete any file permanently by pressing ‘Shift + Delete’ on your keyboard. This will automatically skip the Recycle Bin, so make sure you don’t want to possibly recover the deleted file later.
Optimize & defragment drives
In the age of solid-state drives the need to defrag your computer has become more and more redundant. This is because you should not defrag your SSD as the process can reduce their life span.
Thankfully Microsoft has taken this into account and runs a similar process called TRIM on any SSDs instead.
Before starting, it should be noted that the defragment process can take a very long time, even an hour, so make sure to reserve enough time for it to complete. You should not do anything else on the system during the optimization process.
In order to access the disk defragment tool, simply open up the Start Menu and type ‘Disk Defrag‘ in the search bar. You should now see an app labelled ‘Defragment and Optimize Drives‘, which you should then start up.
You should now see a window containing a list of all of your available drives. To run a defrag on one or more drives, follow these steps:
- Highlight all of the drives you wish to defragment.
- Click ‘Optimize all‘, after which your selected drives will be analyzed and optimized.
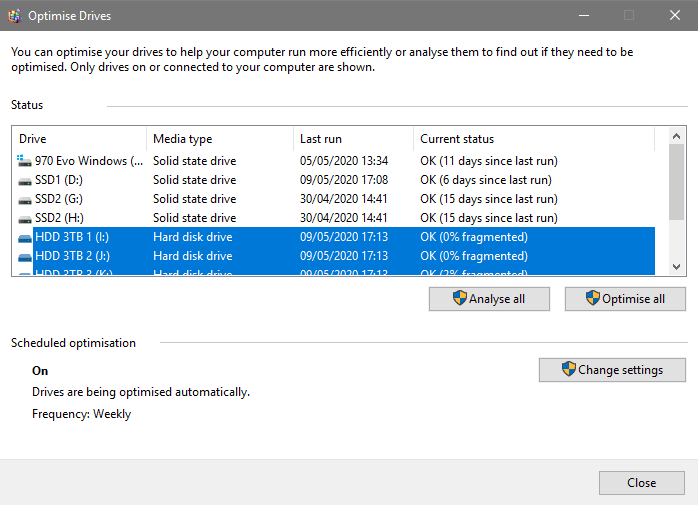
If you decide to select any SSDs from the list, a TRIM will be performed on it, rather than a defrag. TRIM is an SSD specific way to remove invalid data which can in some cases speed up the performance of the drive.
You can setup a scheduled disk defrag on a frequency of your choice, it is recommended to run a defrag at least once a month in order to keep your drives performing at peak speeds at all times.
Remove useless stuff with Windows Uninstaller
Lack of storage space will often cause a computer’s performance to deteriorate drastically. Often a slow computer can see a large performance boost by simply uninstalling unwanted programs.
This is mostly due to the fact that your drives will perform at higher speeds when they are less cluttered and have fewer files to index through. This is also why you should perform defragmentation on your drives on a regular basis.
Using the new ‘Add or Remove Programs’ feature
Microsoft wants you to forget about the old Control Panel and move over to the new Settings interface, which is why the primary way to uninstall programs has also been moved there.
To access this uninstaller, navigate to your Windows Search bar and type ‘Add or Remove‘, then select the ‘Add or remove programs‘ option.
This will open up the Apps & Features tab in the Windows Settings and you will now see all the programs and apps that are installed on your computer.
The list also includes any apps or games that have been installed through the Microsoft Store.
In order to uninstall a program, simply click on one and select ‘Uninstall‘. This will run the official uninstaller for the app, as long as all the files are still intact.
Note that sometimes the uninstaller will just run in the background, so you should wait until the entry disappears from the list before moving onto the next one.
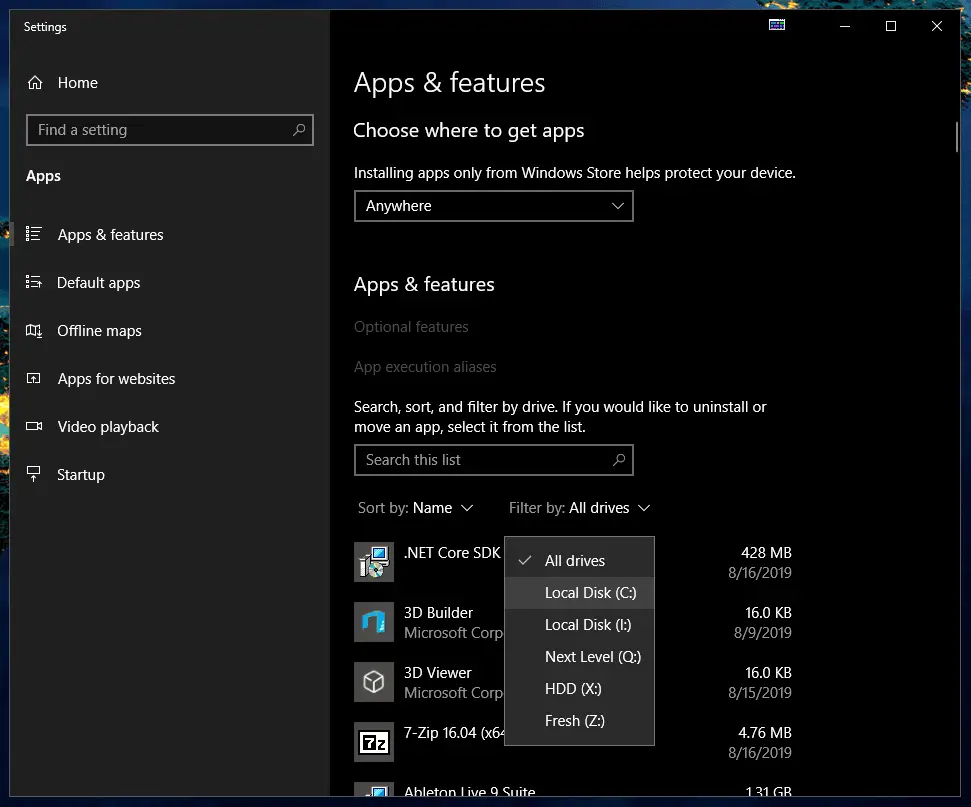
The nice thing about the new uninstaller is that you can even filter installed programs by drive, so if your mission is to speed up a specific drive, it is very simple to do. You can also sort programs by size so you can see which ones hog up the most space.
You can also select any Microsoft Store app you have installed and it will have a separate ‘Advanced options‘ hyperlink under the title. Click on it to see how much data and battery the app is using as well as what permissions it has.
If it’s an app that you don’t use regularly but it has high data or power usage, this may be a sign it has been running in the background without you knowing, potentially slowing down your computer.
Clear out Web Browser cache
Everyone uses the internet daily and in order to browse websites and watch videos, you need to use a web browser. Every time you enter a new website, it is going to store some information in a cookie which takes some amount of space on your drive.
Alongside cookies which usually don’t take up a lot of space, the web-browsers store images, videos and other into your local cache in order to not have to fetch them from a web server multiple times.
A lot of this junk is cleared when you restart you PC, but a lot of it stays there due to poor optimization and other issues. This is why you need to make sure to empty out your browser cache manually every once in a while.
The principle is the same, but the navigation varies between browsers, so we listed a way to clear your cache for a few of the most popular browsers.
 Chrome
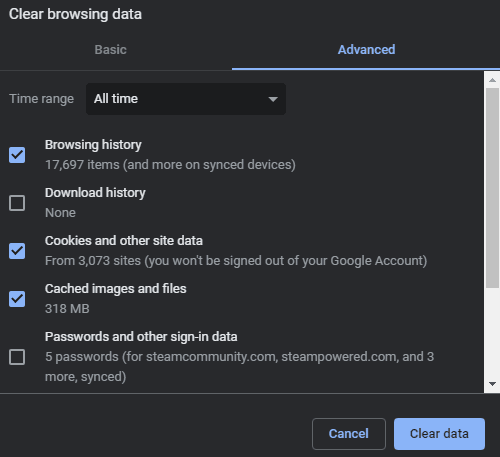
- In order to get to the browser data settings, you need to copy and paste the following into your browsers search bar:
chrome://settings/clearBrowserData
- At the top of the menu select the ‘Advanced‘ tab.
- Change the ‘Time Range’ at the top to ‘All time‘ to ensure all, old and new, junk is cleared.
- Select the following items:
- Browsing history
- Download history
- Cookies and other site data
- Cached images and files
- Click the ‘Clear Data‘ button and your cache will be cleared.
 Firefox
- In the top-right corner of your browser, click on the book icon.

- Locate and click on the ‘History‘ sub-menu and select ‘Clear Recent History‘.
- Make sure to set the ‘Time range to clear‘ to ‘Everything‘, so your entire cache will be cleared.
- Select which elements of the cache you want cleared, for a full purge, check all boxes.
- Click the ‘Clear Now‘ and your cache will be fully cleaned out.
Microsoft Edge
- At the top-right corner of the browser, click the star icon, this will take you to the hub.
- Navigate to the ‘History‘ tab and select ‘Clear all history‘.
- Select the following items:
- Browsing history
- Cookies and saved website data
- Cached data and files
- Download history
- Optionally clear out Website permissions as well, for added security.
- Click the ‘Clear‘ button and your cache will be emptied.
Clean up Windows temporary files and cache
Programs will often store temporary files on your hard drive in order to take advantage of them later. These files are often small and few in quantity, but they can eventually add up to a significant amount of space.
The main reason these often end up accumulating is because a lot of apps and programs don’t bother deleting their own temporary files and if you uninstall those apps, sometimes they leave stuff behind permanently.
Wipe the Temp folder for fast gains
Thankfully there’s a simple way to go through your temporary files and cache to delete those files. Note: Make sure you’re deleting only files that you know you don’t need! For example, ones in folders for apps you’ve already uninstalled.

The main temporary file folder in which you can safely delete every file, can be found with the following steps:
- On a Windows 10, all you need to do is type in ‘%temp%‘ in to the Start Menu and press Enter to open up the temp folder.
- If on an older version of Windows, press the Windows key + R to open the ‘Run‘ prompt. Then type the same ‘%temp%‘ in the box and click the OK button.
- Now that you’re in the temp folder, just delete every file and folder within it. You can do it quickly by selecting all by pressing Ctrl + A then press Shift + Delete to delete everything permanently (skipping the Recycle Bin).
You don’t need to worry as these files are safe to delete and will eventually be replaced again. This means you can repeat this process to keep the size of the folder low, but it will keep going back up fairly fast so this is not a permanent solution.
Clean up the Local, LocalLow & Roaming folders
These three folders contain more critical data and require caution when messing with. However, they can contain tons of old files and installers used by software you no longer have installed.
In order to find these folders, you need to locate the hidden AppData folder. To do that, you can use the method above and type in ‘%AppData%‘ into your Search Bar or the Run prompt. This might take you directly to the Roaming folder, but you can click the left arrow at the top left to go back to the AppData folder itself.
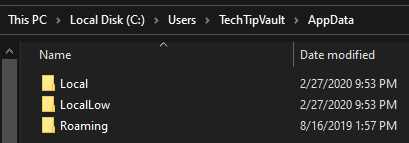
Now all you need to do is browse around those three folders and check if you can find some folders belonging to old programs you no longer have installed and delete those folders.
Remove unwanted startup programs
The main indicator of a PC becoming slow, is that it takes longer to boot up. Although this can be partly due to degrading hardware as well as hard-drives filling up, another major factor is the amount of startup programs you have.
The more start-up programs you have enabled, the longer your computer will take to load up everything. There are tons of small services and programs that have slim to no effect, but some larger programs can add up a dozen precious seconds.
Remove startup programs with Windows Task Manager
The first and easiest method is to do this through the Task Manager.
You can easily open up the Task Manager by pressing Ctrl + Shift + Escape key combination. Alternatively you can also right-click on the taskbar and click on the Task Manager option.
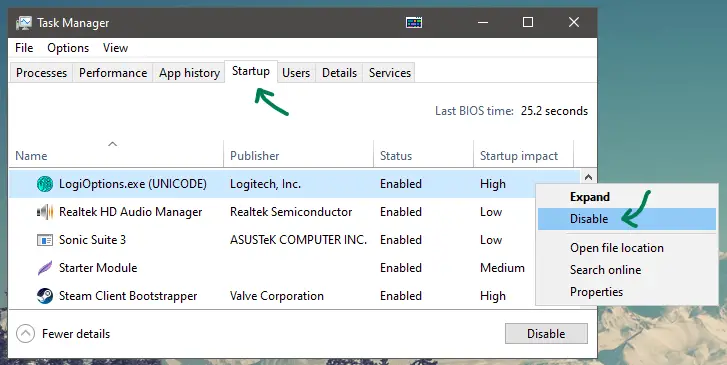
Now that you’re in the Task Manager, look for the Startup tab at the top on the window. Click on it to open up a full list of all your startup programs.
From the list you can see the name, status and the impact of each program on your boot time. Now all you need to do is right-click on any of them and select the ‘Disable‘ option.
Modify startup programs Using CCleaner
We went through the features of CCleaner earlier in the guide, which you can check out by clicking here.
The the nice thing about this method is that you can do so many other things with CCleaner as well, which is why it’s not a big deal that it’s a third-party program.
Another great thing about it is that you can also see any scheduled tasks like automatic updates for certain applications and turn them off. This will prevent any unwanted tasks from starting up in the background. This is not possible to do with the basic Task Manager.
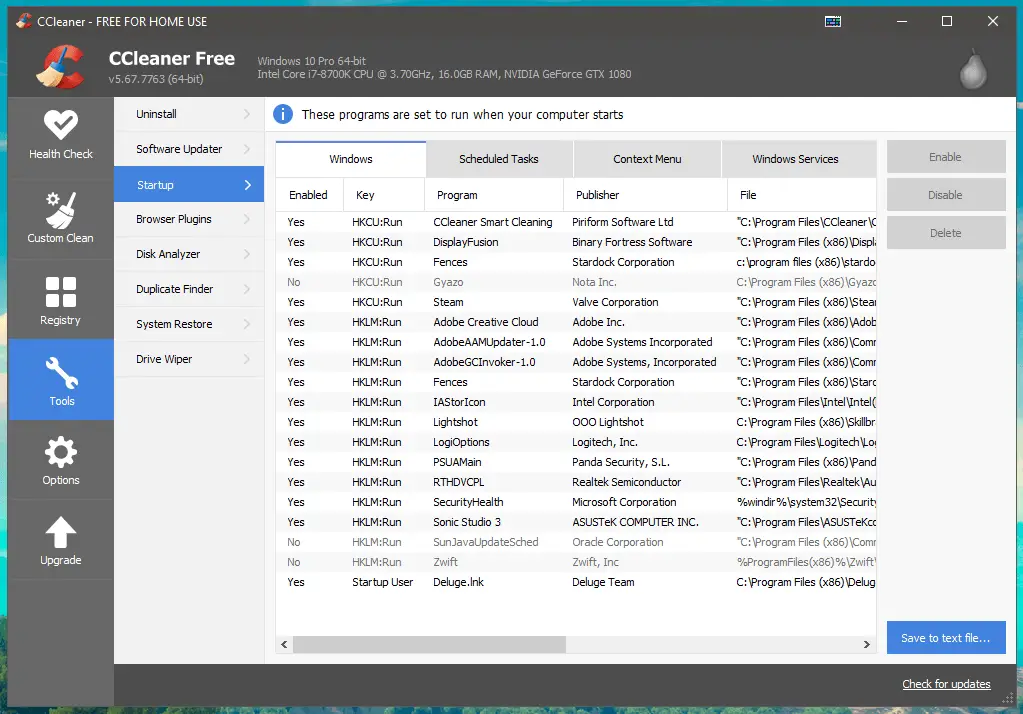
In order to enable or disable startup programs with CCleaner, all you need to is navigate to the Tools menu and select the Startup section.
From there you can select the Windows tab to see the same programs you would see from the Task Manager as well and the Scheduled Tasks tab will let you disable any automated tasks.
Update all your drivers
As time goes on, manufacturers release new versions of their device drivers to improve performance and functionality as well as reliability.
A device could be running slow (or not at all) due to a compatibility issue or as the result of a poorly designed driver. To resolve this, you should check the internet for an updated driver in hopes to fix the issues.
To find and update your devices, type in ‘Device Manager‘ into your Windows Search Bar and open it up. You should now see a list of all your connected devices, which can be expanded by clicking the arrows next to the device categories.
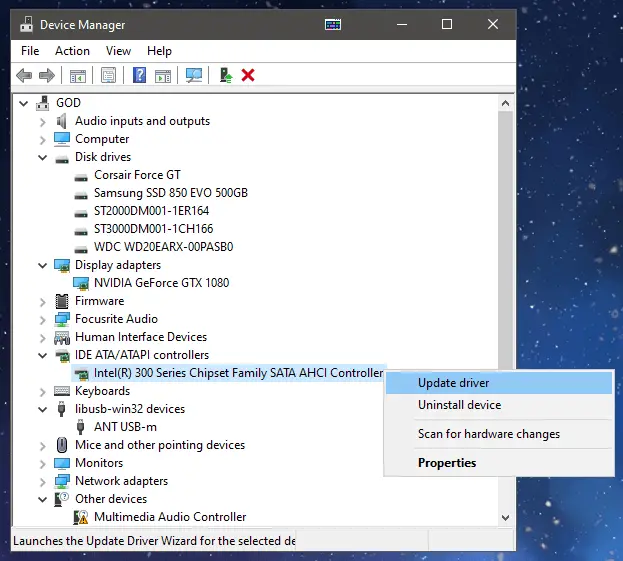
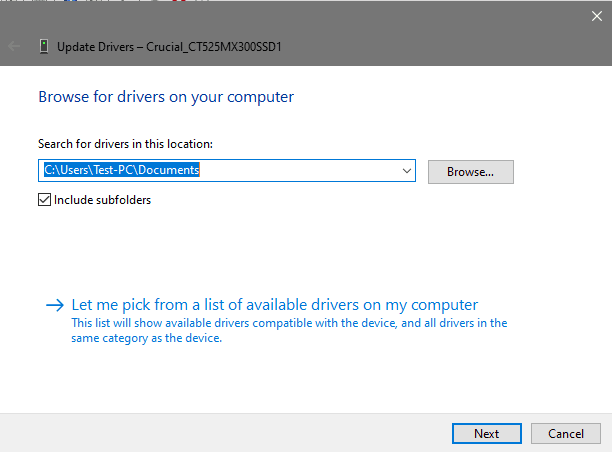
Now, in order to update a driver, right click on any device and select Update driver at the top. You will now be asked to either look for an update automatically, or select an installation file from your computer. We recommend the automatic process first and if it doesn’t find anything, move on to the next step.
If the automatic update didn’t work, you need to search for any updated drivers online. To do this, you should first note the name of the device from the Device Manager.
Now that you have the device make and model, write it into Google and type ‘drivers‘ after it to find the appropriate site. If the search query didn’t find accurate results, head over to the manufacturers website and find the support tab.
If you find a proper firmware update, download it and go to your download directory. Most drivers can be directly installed by double clicking on them, but if it doesn’t work, use the previous Device Manager menu to install it manually.
While this method can fix a lot of issues if using older devices, new devices are usually shipped with the newest firmware and this process is not necessary. In most cases updates are released every year or two.
Turn off Windows automatic updates
Windows Updates are notorious for popping up at the most inopportune times, but lesser known issue with them is that by default, they get downloaded and installed in the background while you are working or playing games.
In order to access the Windows Update Settings simply type in the Windows Search bar ‘Windows Update’ and click on the aforementioned option.
Now that you are in the Windows Update window, you can scroll down to see a bunch of options. You can change the active hours when the device is usually being used.
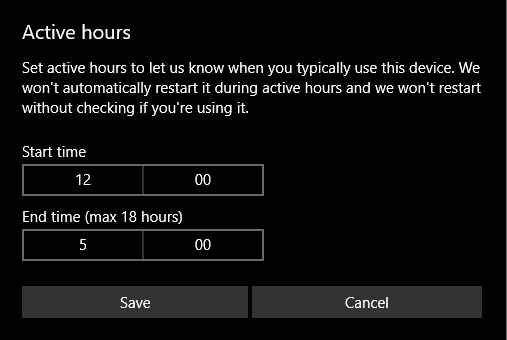
The active hours will prevent any interruptions or updates being downloaded or installed during the set time period. This will also prevent any automated restarts during that time.
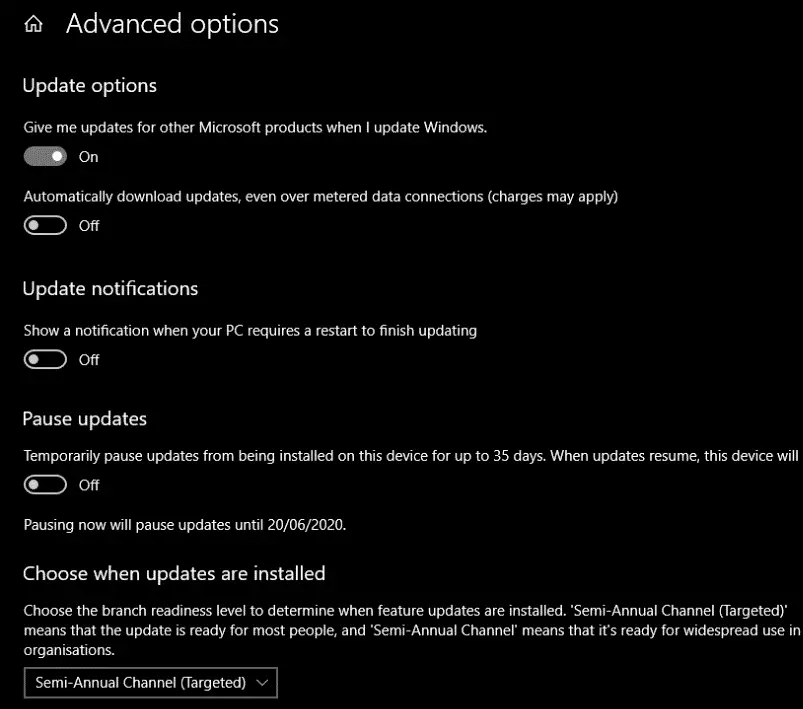
In the ‘Advanced Options‘ menu you will be able to choose how and when updates are delivered to your computer. This includes automatic downloads and installations, update notifications and scheduled updates.
You can even pause any ongoing update processes on your device, which will prevent any potential updates from being installed for up to 35 days.
You can also install Windows updates without an internet connection by using other devices on which you might have downloaded them previously.
Double check your screen Refresh Rate
Nowadays a monitor will more often than not have a higher than 60 hertz refresh rate. This is due to constantly increasing specs and overall performance, so more and more machines are able to run games at higher frames and high fps video editing is very common.
If you have a monitor with higher than 60 hertz maximum refresh rate, you need to change it manually before you can take advantage of the awesome smooth performance that the higher refresh rate offers.
This can sometimes be set automatically, but for most users it will remain at 60hz by default, making the computer seem sluggish and its performance seem slower than it should.
In order to check and change the refresh rate for your monitor(s), you need to first right-click on your desktop and select the ‘Display Settings‘ option at the bottom.
Now scroll down until you see a link saying ‘Advanced display settings‘ and open it up.
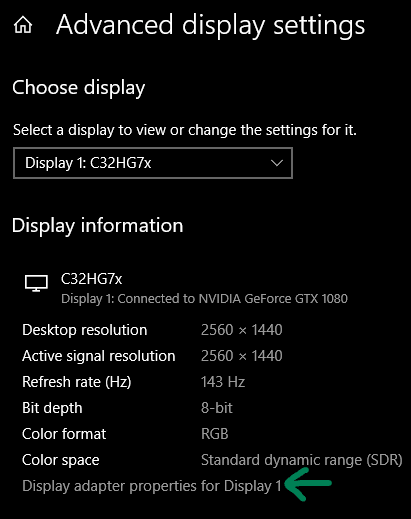
You should now see a drop-down menu of all your monitors and their resolutions and refresh rates. If you notice the refresh rate shown says 60hz or if it’s just lower than your supposed maximum refresh rate, click on the ‘Display adapter properties‘ link at the bottom.
A new window will pop up showing more information about your graphics card and monitor. Click on the ‘Monitor‘ tab at the top and change the refresh rate from the drop-down menu. Finally just click OK to save any changes.
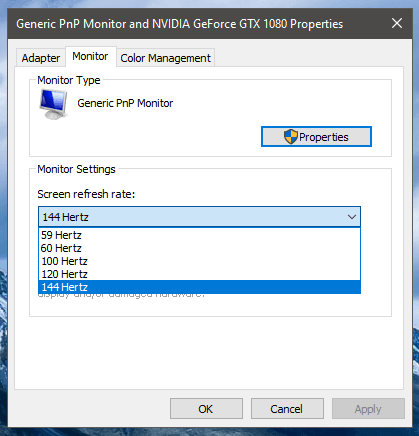
If you don’t see additional refresh rates in your monitor settings, then your monitor either doesn’t support higher refresh rates or your PC is not recognizing the monitor properly.
If this is the case, check out the driver update section of this guide to update your monitors firmware.
Remember to repeat this step for all your monitors, as each one needs to be separately. Don’t worry, you can have all your monitors be running at different refresh rates simultaneously without any issues.
Clean up viruses and malware
Viruses and malware have been around as long as computers and are often treated only as a security risk. However, alongside being a risk to your private information, they can often try to utilize your PC’s performance for malicious means.
There are tons of different types of viruses, malware, adware and injections that you don’t even know are hogging up a massive portion of your performance.
This is why it’s crucial to keep your security up to date and run scans for all the different types of threats regularly to prevent your system from becoming a sluggish security risk.
To perform a virus scan using Windows’ own tools, you will first need to access Windows Security. To do so, simply search up ‘Windows Security‘ in the Windows Search bar.
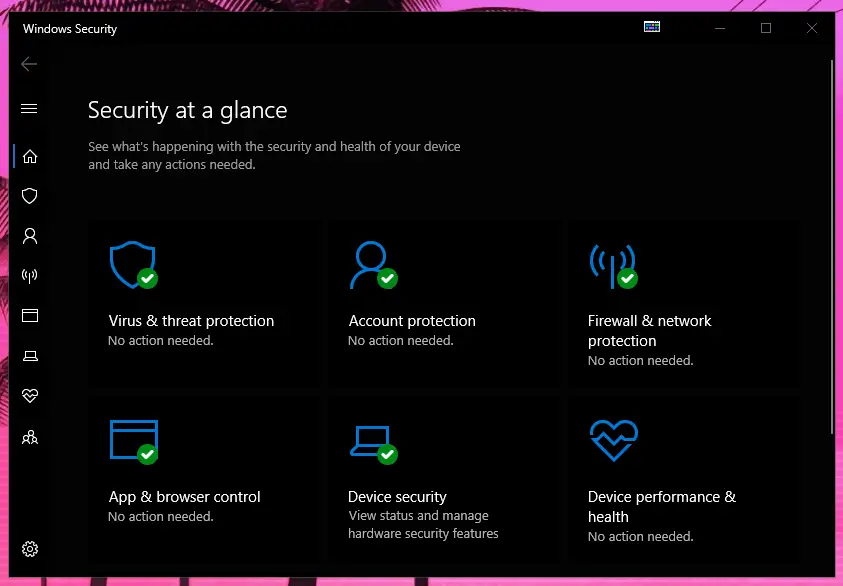
Now that you see the security window, the first thing you want to do is make sure your Windows Security is up-to-date. To do this, simply open the ‘Virus & threat protection‘ tab and look for the ‘Check for Updates‘ button.
After you have updated your Windows Security, go back to the Virus & threat protection page and select ‘Scan options‘ under the ‘Current threats’ section.
Here you can choose to run a full scan that will check all files and programs on your hard disks, which will take a long while, sometimes even hours. We recommend not to mess around the computer much during the scan to avoid any file locks or collisions.
Modify Windows Visual Effects for Performance
Windows 10 has many system effects that look fancy but can take a toll on system performance. By disabling or reducing the quality of these effects users can notice a boost in performance of their system.
Most people don’t even realize the amount of different effects there are within Windows, but things like dragging, minimizing, mouse movements require their own graphics or animations.
In most cases disabling or lowering these effects wont have a huge improvement in your general PC performance, but most likely will give you a noticeable increase in response times and “snappiness” of your operations when browsing the internet or shuffling around your files.
To manage your Windows 10 visual effects, you need to navigate to the visual effects options using the following steps:re
- Type ‘Run‘ into your Windows Search Bar and open up the Run prompt.
- Type in ‘sysdm.cpl‘ and click OK to open up the System Properties window.
- Now navigate to the ‘Advanced‘ tab at the top-middle and click ‘Settings…‘ in the Performance section.
You should now see a long list of all the effects and features you can toggle in order to improve your Windows speed and performance.
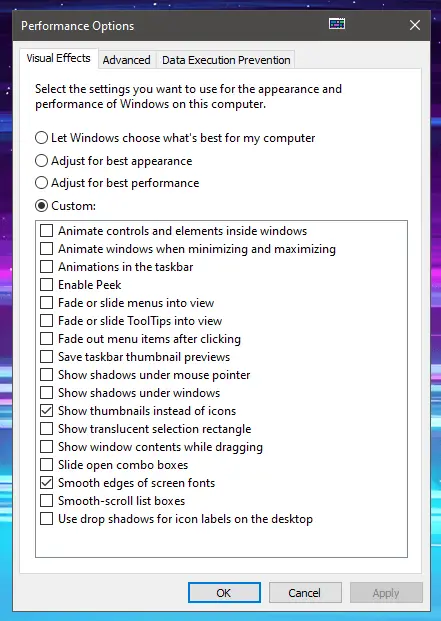
The easiest way to do this is select the ‘Adjust for best performance‘ selection to automatically turn off the most taxing settings.
Optimize your power options
Windows 10 has a few different types of power plans built-in and a ton of different features and limitations that can be toggled on or off.
Most of these limitations can have a huge impact on your machines performance, yet a lot of people completely forget that these exist.
You may have come across these settings if you’re using a laptop, due to their power-saver mode. However these power plans are used on all Windows operating systems, albeit not toggled around as much on desktop machines.
There are multiple pre-made power profiles including ‘Balanced‘, ‘Power Saver‘ and ‘High Performance‘ to allow for quick switching between different power usage on your device.
Thankfully, you can customize all of these plans manually in order to have multiple different options according to your own needs.
In order to change and modify power plans, you need to navigate to Power Options:
- Open up your Windows Search Bar from the Start Menu and type in ‘Edit power plan‘ and open it up.
- Click on the ‘Change advanced power settings‘ hyper-link.
If you don’t see the above option in the search results, you can find the same options manually:
- Search and open Control Panel in your Search Bar.
- Sort by ‘Category‘ at the top-right and click on the ‘Hardware and Sound‘ title.
- Click on the ‘Power Options‘ title and click ‘Change plan settings‘ next to a plan.
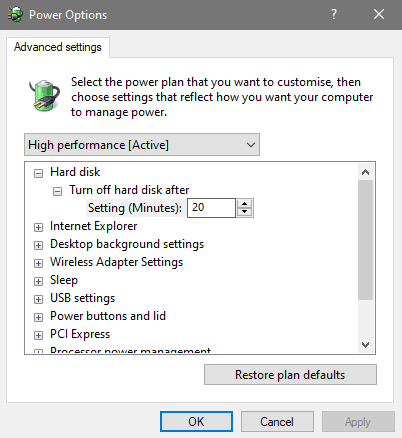
- Finally select ‘Change advanced power settings‘ to open up the Power Options window.
Now you can easily customize all the settings from each of your separate power profiles to optimize your system for maximum performance, while still maintaining the option for a power-saver mode if using a laptop.
Modify BIOS settings for faster boot time
If you are not familiar overclocking or have never assembled your own computer, you might not be familiar with BIOS. It stands for Basic Input/Output System and it is basically a firmware on your motherboard which is used for hardware initializing and possible tweaking of your hardware settings.
It is completely safe to use the BIOS interface, but we don’t recommend messing around too much with any advanced settings to avoid any complications.
In order to open up your BIOS interface, you need to first power on your PC and while it’s booting up, press either the Delete or F2 key when you see your motherboards logo on the monitor.
A menu should then open up with all kinds of settings. The BIOS interface will look different depending on your motherboards manufacturer and some older models don’t even support mouse operations, only keyboard navigation. However, the settings and options should be more or less the same across the spectrum.
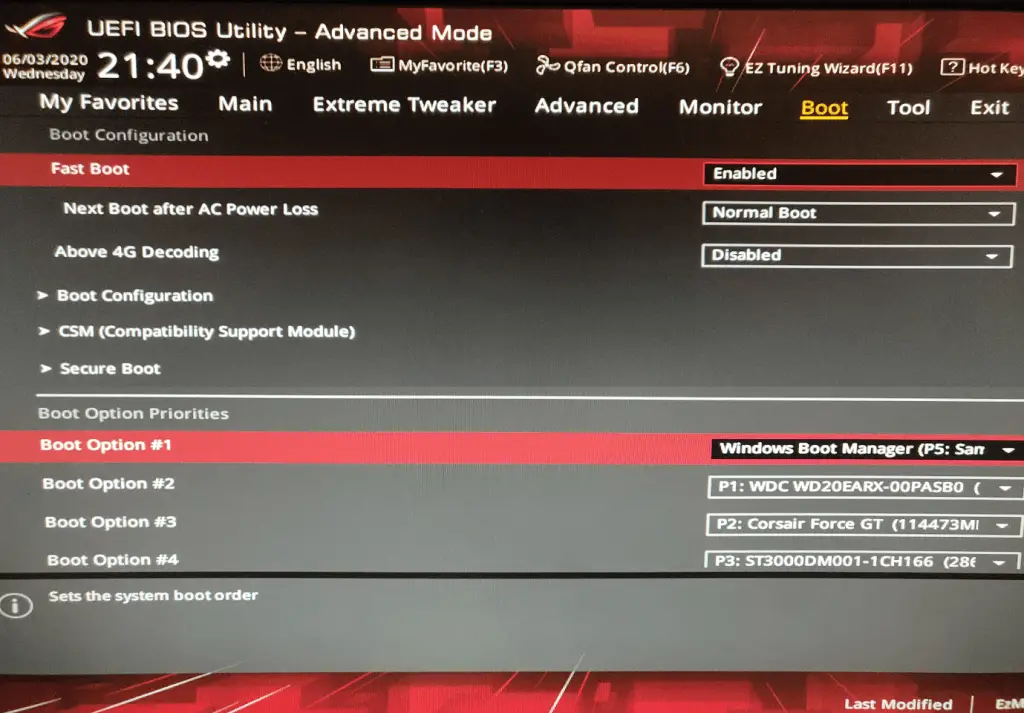
The next thing you need to look for is the Boot settings. It might be located in a different sub-menu, but should be quite straightforward to find.
Next look for an option called Fast Boot and make sure it is Enabled. Once you have enabled Fast Boot, your computer will always start up all the critical hardware first and once your system has booted, only then will all the USB devices and peripherals be started up.
Enabling Fast Boot alone can speed up your boot time by multiple seconds.
The other thing you should change in your BIOS is the driver boot order. As seen in the image above, all the drives have a boot priority and you need to make sure the drive on which your Windows 10 is installed, boots up first.
If it’s not set as Boot Option #1, your system will initiate other drives first which will delay startup time by quite a bit.
There are a bunch of other options you can modify to make your system faster, but we won’t go into detail in this guide to keep things compact.
As you may have noticed, there are a million different things you can do to improve your computers speed and performance and they can’t all possibly be listed into one guide.
We hope you found some useful information from this guide and managed to get more juice out of your system. If nothing helped, it might be time to upgrade your components.
If you have any suggestions, complaints or things we could add, don’t hesitate to contact us through our About Us page.